This page aims to give you the lowdown on where you should be putting your hands and fingers on your lovely new guitar – guitar hand positions.
Many guitar articles make reference to the fingers of each hand by the following nomenclature. Left handed guitarists simply swap everything that is described here around.
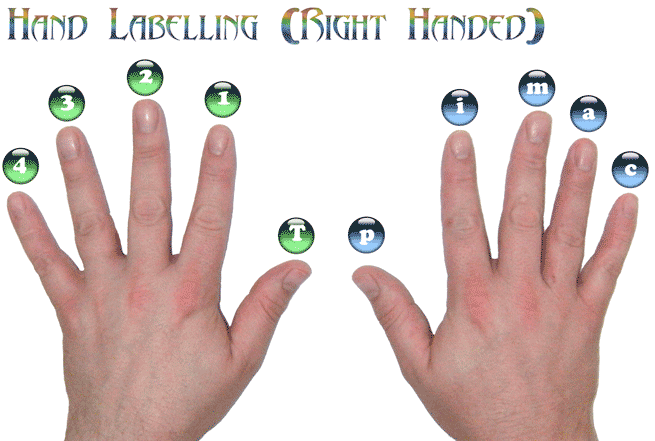
Here, the left hand is the fretting hand and the fingers are labelled T (thumb) and 1 (index), 2 (middle), 3 (ring) and 4 (pinky). The right hand is the picking hand and is labelled p (pulgar or thumb), i (indice or index), m (medio or middle), a (annular) and c (chico or pinky). PIMAC for short. Easy, no? If you’d like to see the above diagram for the left handed format click here.
Fretting Hand (left)
Thumb Position
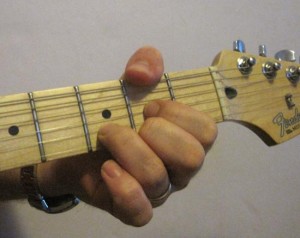 Where your left thumb should go (right thumb for left-handed guitarists) is a common point of contention amongst guitarists. There are some who feel that it is an absolute no-no to see a thumb hanging over the top of the fretboard (left). Others actually utilise the thumb to fret the 6th string, allowing some interesting chord variations. Personally, I’m quite easygoing on the great thumb debate.
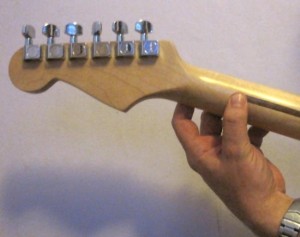
My advice is that you, as a newbie-guitarist, should consider keeping the thumb placed right in the middle of the back of the guitar neck as this allows the pressure to be applied most efficiently by your fretting fingers and encourages independent movement of your fretting fingers. This will also make it easier for you to ensure that it is the tips of your fingers and not the fleshy pads of your fingers that are pressing on the strings (the latter prevents clean-sounding notes from being played). As your fingers become stronger and fretting becomes easier for you, you should try experimenting by employing your thumb to the 6th string for certain chords.
Bad Habit Alert!
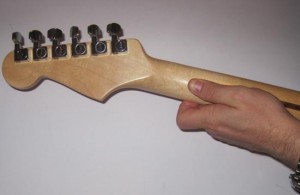
Try to avoid having your thumb running parallel to the back of the guitar neck (rather than perpendicular to) as though you’re hitching for a lift. Many newbie guitarists find themselves doing this automatically and it has a detrimental effect on your fretting ability – have you tried picking up a heavy object with your thumb sticking out to the side? Your thumb is opposable… it’s one of the reasons why we’ve evolved to play the guitar. Try to be conscious (at least at first – it will become second nature) of where your thumb is on the neck and watch out for this particular bad habit.
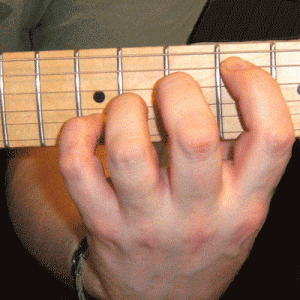
Fingers
One finger one fret is the rule for most guitarists. And care must be taken to use the tips of the fingers rather than the soft pad of the fingers (or your playing will be muted and the strings won’t ring out when played).
Picking Hand (Right)
Plectrum
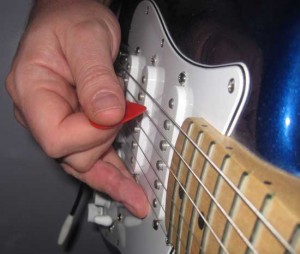 If you prefer to use a plectrum when playing guitar (also known as a guitar pick), then you should hold this between your thumb and the first joint of your index finger on your right hand (left hand if you’re a leftie guitarist). In the picture (right), I am exposing more of the plectrum than I would normally for clarity but by varying the amount of plectrum showing you can vary the strength of your “attack” on the guitar strings and thus the sound achieved (depending on plectrum flexibility). Also note the position of the third and fourth fingers of the playing hand – I use those to “anchor” my hand above the strings for greater control over the position of the right hand. Obviously this is more suited to picking different strings as opposed to strumming. If you feel that anchoring your hand in this is way is too restrictive then don’t do it. You should experiment with playing hand positions and find what works best for you – as long as you can hit the desired strings accurately and with good timing (use a metronome!) then that’s the most important thing to get right.

One comment
Comments are closed.